Showing posts with label Favorites. Show all posts

Thursday, May 28, 2009

Pink Lady Cake


I had seen this recipe on one of my favorite food blogs, Smitten Kitchen, several months ago. It's exceedingly rare that I have the occasion to make a layer cake unless I want Michael and myself to eat the whole thing (which wouldn't be an entirely bad thing).

Despite the fact that it is a ginormous cake, what with the three layers, it was not difficult to make. The cream cheese frosting, while not the best frosting to use if you want your cake to look flawless, complemented the flavor of the cake very well. And the cake was delicious. The strawberry flavor was very pronounced. Like the original poster, I used frozen (thawed) strawberries. I also used two colors of food dye - pink and red (Wilton gel) - to make the cake match its name.

The cake is very dense, which was fine unless you're a pig like me and would like a large slice. Between the height of the cake and its denseness, thin slices will go a long way, which is excellent if you're cooking for a crowd.

Pink Lady Cake
4 1/2 cups cake flour
3 cups sugar
5 1/4 tsp baking powder
3/4 teaspoon salt
3 sticks (12 ounces) unsalted butter, at room temperature
1 1/2 cups pureed frozen strawberries
8 egg whites
2/3 cup milk
1 to 2 drops red food dye, if using (to make the pink color pop more)
3 (8 ounce) packages cream cheese, softened
3/4 cup (1 1/2 sticks; 6 ounces) unsalted butter, softened
3 cups sifted confectioners’ sugar
2 tsp vanilla extract
Preheat the oven to 350 F. Butter three 9-inch round or 8-inch square cake pans. Line with parchment or waxed paper and butter the paper. Put the flour, sugar, baking powder, and salt in a large mixer bowl. With the electric mixer on low speed, blend for 30 seconds. Add the butter and strawberry puree and mix to blend the ingredients. Raise the speed to medium and beat until light and fluffy, 2 to 3 minutes; the batter will resemble strawberry ice cream at this point.

In another large bowl, whisk together the egg whites, milk and red food dye, if using, to blend. Add the whites to the atter in two or three additions, scraping down the sides of the bowl well and mixing only to incorperate after each addition. Divide the batter among the three prepared pans. Bake the cakes for 30 to 34 minutes, or until a cake tester or wooden toothpick inserted into the center comes out clean. Allow the layers to cool in the pans for 10 to 15 minutes. Invert and turn out onto wire racks and peel off the paper liners. Let stand until completely cooled before assembling the cake, at least an hour.

In a medium bowl, cream together the cream cheese and butter until creamy. Mix in the vanilla, then gradually stir in the confectioners’ sugar. Store in the refrigerator after use.

Frost and assemble the cake. Place one cake layer on a cake board or platter. Tucking scraps of waxed paper under the edges of the cake will protect the board or plate from any mess created while frosting the cake. Spread about 2/3 cup frosting over the layer, spreading it to the edge. Repeat with the second layer. Add the top layer and frost the top and sides of cake with remaining frosting, reserving a small amount if you wish to tint it and pipe a decoration on the cake. If not, you can decorate the cake top with thinly-sliced strawberries. Remove the waxed strips to reveal and neat, clean cake board.

Thursday, January 22, 2009

Crock Pot Chicken and Dumplings

Amazing. Not much to look at, but just totally delicious. We had my parents over for dinner on Monday, and since I was off, I had time to make a full dinner (salad, chicken and dumplings, cake). This was the star of the show. Super easy, tender and though its base is canned cream of chicken soup, the addition of other ingredients assures that the soup isn't all you taste. I definitely plan to make again.

A few tips, based on my experience: put the chicken in the crock pot while it's still frozen. Often times the meat I cook in the crock pot gets too chewy, but I think this prevented that from happening (kept the juices inside). Additionally, since this isn't a baked good, I didn't worry about sticking to the precise amounts of liquid, etc. that the recipe suggested. I figured I could add more later if necessary. For instance, the broth didn't fully cover the frozen chicken breasts from the start of the cooking, but I didn't want it to be too thin, so I took my chances and in the end, no extra was needed. Also, I didn't initially have the two cans of soup that the recipe called for (added #2 with the bicuits), so I substituted some sour cream flavored with chicken broth and boullion to add more creaminess and thickness. While I couldn't taste the sour cream, I think it helped to mellow the taste of the canned soup.

My parents, Michael and I all gave this a thumbs up. In fact, I can't wait to make it again!


Crock Pot Chicken and Dumplings
Adapted from this recipe at AllRecipes.com
Yield: 6+ servings

4 Skinless, boneless chicken breast halves, still frozen
2 Tbsp butter
2 (10.75 oz) Cans condensed cream of chicken soup
1/2 Large container of chicken broth
1 C light sour cream, infused with chicken boullion and broth to slightly thin
1 Onion, diced (I used frozen diced onion)
1 (10 oz) Package refridgerated buscuit dough
Spices of your choosing, to taste (I used cumin, poultry seasoning, garlic powder, pepper and dry mustard)

Place the chicken, butter, soup, sour cream mixture and onions into crock pot, and fill with enough broth to cover (I added roughly half of the amount found in one of those cardboard containers - which wasn't enough to cover). Cover and cook on high for about three and a half hours. Shred chicken and return to crock pot. Flatten individual biscuits, cut once crosswise then into strips, adding them into the pot and stirring to cover with liquid. Cook for about 90 minutes more on high. Serve and enjoy!

Tuesday, November 18, 2008

Chocolate Almond Cupcakes with Coconut Frosting

Not gonna lie. These were freaking unbelieveable. One of the best desserts I've ever made. Certainly the best chocolate cake-based recipe I've ever made. The cake was light and fluffy. The frosting was phenomenal - not too sweet but sweet enough. Not the easiest to eat if you want to stay neat (cake crumbs and coconut flakes will fall about) but who cares? You won't, once you take a bite.

I had wanted to make Ina's coconut cupcakes but wanted to make something chocolate. I found this recipe that I had long ago printed from Epicurious and decided to use Ina's frosting. Delicious. While I plan on trying her coconut cupcakes, I can't wait to make these again. One aspect of these that I particularly enjoyed is that they incorporate actual almonds, not almond extract, to get the nutty flavor. Not a fan of the extract, love the actual nut.

If you like Almond Joy, you'll like these. Even if you don't, so long as you aren't adverse to coconut, you'll like them. Yum.
Chocolate Almond Cupcakes
Source: Epicurious.com
Yield: 30 cupcakes


3/4 cup blanched almonds (or rounded 1/2 cup blanched slivered almonds)
1 1/2 cups sugar
6 cups sweetened shredded coconut (from two 14-ounce bags) [I used less than this, due to not needing as much to coat the frosting.]
2 1/4 cups all-purpose flour
1/2 cup unsweetened cocoa powder
1 Tbsp baking powder
1 tsp baking soda
1/2 tsp salt
2 oz unsweetened chocolate
1 cup (2 sticks) unsalted butter, room temperature
4 large eggs, room temperature
1 (13 1/2-oz) can unsweetened coconut milk, stirred
2 tsp pure vanilla extract


Frosting
Source: Ina Garten, FoodNetwork.com


1 pound cream cheese at room temperature
3/4 pound (3 sticks) unsalted butter, room temperature
1 tsp pure vanilla extract
1/2 tsp pure almond extract
1 1/2 lbs confectioners' sugar, sifted

Preheat oven to 350°F.

In food processor, process almonds and 1/2 cup sugar until finely ground. Add 2 loosely packed cups shredded coconut and pulse twice to chop slightly. Transfer mixture to medium bowl and whisk in flour, cocoa, baking powder, baking soda, and salt.

Melt chocolate in microwave, being careful not to burn. Stir until smooth and set aside.

Using electric mixer, beat butter and remaining 1 cup sugar at high speed until fluffy, about five minutes. Beat in eggs one at a time, beating well after each addition. Add melted chocolate and beat at moderate speed until incorporated. Add 1/2 of flour mixture and mix at low speed until nearly smooth. Add coconut milk and vanilla and mix at low speed until blended. Add remaining flour mixture and mix at low speed until smooth.

Spoon batter into prepared muffin cups (paper cups), filling to about 2/3 full. Bake until tester inserted in center of 1 cake comes out clean, about 22 minutes. Cool in pans on racks.

Meanwhile, make the frosting. In the bowl of an electric mixer fitted with the paddle attachment, on low speed, cream together the cream cheese, butter, and vanilla and almond extracts. Add the confectioners' sugar and mix until smooth.


Pour remaining shredded coconut into 9-inch-square baking dish. Spread frosting on cakes and invert each into coconut to coat frosting liberally. Garnish with Jordan almonds, if desired.

Tuesday, September 2, 2008

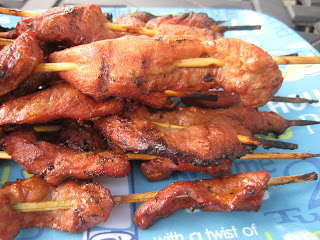
Filipino Pork Barbecue

Michael's mom makes great barbecue. Her sons request it fairly often, to the point that she doesn't really enjoy making it anymore. Still, it's a rare treat when we get to have it. A few months ago I bought a Filipino cookbook in order to learn some recipes on my own. Not wanting to steal Juanita's thunder, when I decided to make Filipino barbecue for Labor Day, I took to my cookbook, rather than asking for her recipe, knowing that it would not be exactly the same. (Plus, knowing the recipe so well, she just eye balls all of the ingredients, which would have been of no help to me).

This recipe consists of marinated, thin slices of pork, threaded onto skewers before they are grilled. Slicing the meat thin is the only part of the recipe that requires any skill; if you have a decent knife, it's easier than I expected. This recipe calls for three pounds of pork; since it would be just the two of us eating it, I cut up three pork steaks but used the same amount of marinade. That amount of meat produced 14 skewers.

I was a little iffy on the marinade before tasting it - wasn't sure about the ketchup. After repeatedly reminding Michael that "this is not your mother's barbecue," I was happy to discover that it tastes very similar to Juanita's version. So was he. In fact, he told me that was both good and bad for me - good that I made something so delicious. Bad that he'll now be requesting this regularly.

Pork Barbecue
Source: Phillipine Recipes Made Easy by Violetta A. Noriega
Serves 6-8

3 lbs boneless pork, sliced 1/4" thick, 2" wide
Bamboo or metal skewers

Marinade:
1/4 cup vinegar
3 Tbsp soy sauce
3 Tbsp sugar
3 cloves garlic, minced
1 tsp Worcestershire sauce (optional)
1/4 tsp black ground pepper or to taste
3/4 tsp salt or to taste
1/4 cup ketchup

In a bowl, mix marinade together and let stand for 15 minutes. Marinade pork slices for six hours or overnight (the longer the better) in the refridgerator. Stir meat occasionally to evenly distribute flavor.

Prepare barbecue equipment. Soak skewers (if wooden) in water for at least an hour. Thread meat onto skewers. Placed skewered meat on hot grill. Brush marinade on pork during the course of cooking. Make sure meat is cooked through. Serve immediately.